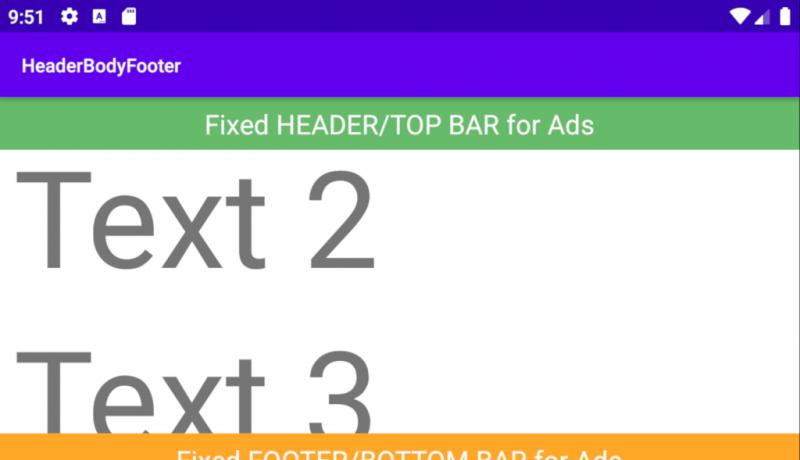
Most of the Android Apps are free with either Bottom-Bar ads or Top-Bar ads. Top-Bar is also called a Header. Bottom-Bar is called a Footer. The place or space in between is called the Body. We can place ads, menu, navigation-bar and other components inside this fixed top or bottom layout. Let us see how to implement an Android Header-Body-Footer layout using a RelativeLayout and a ScrollView. We used the Android Studio in this tutorial for a demonstration.
Also Read: Know how to create a GridLayout with equal-width columns.
Android Header Body Footer Layout with RelativeLayout and ScrollView
We can achieve this Android Header Body Footer type layout using a RelativeLayout. We used ScrollView for the Body to accommodate more content with a vertical scrollbar.
Follow the below steps to implement the above layout.
Step 1: Create a new Project in Android Studio using an "Empty Activity" template. It creates two files named "activity_main.xml" and "MainActivity.java".
Step 2: Change the default ConstraintLayout to the RelativeLayout inside the activity_main.xml. We took three LinearLayouts, one for Header, one for Body and the last for Footer. We used ScrollView inside the Body to accommodate lengthy content with a vertical scrollbar. We can put a list of contents inside for example.
We should set layout_alignParentTop property of the header to true. We should set layout_alignParentBottom property of the footer to true. To keep the body in between the header and footer, we should use two properties layout_above and layout_below as in the below code.
activity_main.xml
<?xml version="1.0" encoding="utf-8"?>
<RelativeLayout xmlns:android="http://schemas.android.com/apk/res/android"
    xmlns:app="http://schemas.android.com/apk/res-auto"
    xmlns:tools="http://schemas.android.com/tools"
    android:layout_width="match_parent"
    android:layout_height="match_parent"
    tools:context=".MainActivity">

    <LinearLayout
        android:id="@+id/header"
        android:layout_width="match_parent"
        android:layout_height="wrap_content"
        android:layout_alignParentTop="true"
        android:background="#66BB6A"
        android:orientation="vertical">
        <TextView
            android:layout_width="wrap_content"
            android:layout_height="wrap_content"
            android:layout_gravity="center"
            android:padding="6dp"
            android:textSize="20dp"
            android:textColor="#FFF"
            android:text="Fixed HEADER/TOP BAR for Ads"/>
    </LinearLayout>

    <LinearLayout
        android:id="@+id/body"
        android:layout_above="@+id/footer"
        android:layout_below="@id/header"
        android:layout_width="match_parent"
        android:layout_height="wrap_content"
        android:background="#FFF"
        android:orientation="vertical">
        <ScrollView
            android:layout_width="match_parent"
            android:layout_height="wrap_content"
            android:scrollbarAlwaysDrawVerticalTrack="true">
            <LinearLayout
                android:layout_width="match_parent"
                android:layout_height="wrap_content"
                android:paddingLeft="10dp"
                android:orientation="vertical">
                <TextView
                    android:layout_width="match_parent"
                    android:layout_height="wrap_content"
                    android:textSize="100dp"
                    android:text="Text 1"/>
                <TextView
                    android:layout_width="match_parent"
                    android:layout_height="wrap_content"
                    android:textSize="100dp"
                    android:text="Text 2"/>
                <TextView
                    android:layout_width="match_parent"
                    android:layout_height="wrap_content"
                    android:textSize="100dp"
                    android:text="Text 3"/>

            </LinearLayout>
        </ScrollView>
    </LinearLayout>


    <LinearLayout
        android:id="@+id/footer"
        android:layout_width="match_parent"
        android:layout_height="wrap_content"
        android:layout_alignParentBottom="true"
        android:background="#FFA726"
        android:orientation="vertical">
            <TextView
                android:layout_width="wrap_content"
                android:layout_height="wrap_content"
                android:layout_gravity="center"
                android:padding="6dp"
                android:textSize="20dp"
                android:textColor="#FFF"
                android:text="Fixed FOOTER/BOTTOM BAR for Ads"/>

    </LinearLayout>

</RelativeLayout>
Step 3: Now put the required code in MainActivity.java. You can set Toolbar Title, initialize the database and any other code in the onCreate() method.
MainActivity.java
package com.example.headerbodyfooter;

import androidx.appcompat.app.AppCompatActivity;
import android.os.Bundle;

public class MainActivity extends AppCompatActivity {

    @Override
    protected void onCreate(Bundle savedInstanceState) {
        super.onCreate(savedInstanceState);
        setContentView(R.layout.activity_main);

    }
}
Step 4: You can change the background colours, font sizes and other components as you wish.
This is it. Congratulations on successfully implementing an Android Header-Body-Footer style layout using RelativeLayout, LinearLayout and ScrollView.
Learn Java basics before diving into Android for fast coding and development.
It is time to share this Android Studio tutorial with your friends and colleagues.
